前言
去年下半年時於 COSCUP 2020 的閉幕閃電秀中與 Chatbot 社群小聚看到社群朋友展示使用 LIFF 來發射彈幕覺得有趣又回憶滿滿,從以前在看ニコニコ動画時就很常看到彈幕出現在影片中(甚至有時候彈幕還比影片還好笑),而透過這樣的互動讓觀眾並及時回饋,拉近活動(影片、直播、演唱會…)與觀眾的距離。想到去年因為疫情需要把社群聚會改成線上,剛好在前一陣子搜尋到這篇文章,以下就使用 Chatbot 搭配文章在使用 OBS 來使用它!
介紹
GSAP
對於一個動畫苦手卻又喜歡看特效的人有工具就再好不過了,除了可以自己寫 CSS Animation 以外,還可以使用 GSAP 這個套件來輔助,以下就使用參考文章中的範例來大概解釋一下運作原理
<!DOCTYPE html> | |
<html style="background:#00FF00;"> | |
<head> | |
<meta charset="utf-8" /> | |
<meta name="viewport" content="width=device-width, initial-scale=1"> | |
<title>彈幕展示</title> | |
<script src="https://cdnjs.cloudflare.com/ajax/libs/gsap/3.5.1/gsap.min.js"></script> | |
</head> | |
<body> | |
<button id="button01">發射</button> | |
<script> | |
const button01 = document.getElementById("button01"); | |
button01.addEventListener("click", function(){createText()}, false); | |
let count = 0; | |
async function createText() { | |
let div_text = document.createElement('div'); | |
div_text.id="text"+count; | |
count++; | |
div_text.style.position = 'fixed'; | |
div_text.style.whiteSpace = 'nowrap' | |
div_text.style.left = (document.documentElement.clientWidth) + 'px'; | |
var random = Math.round( Math.random()*document.documentElement.clientHeight ); | |
div_text.style.top = random + 'px'; | |
div_text.appendChild(document.createTextNode('移動中'+count)); | |
document.body.appendChild(div_text); | |
await gsap.to("#"+div_text.id, {duration: 5, x: -1*(document.documentElement.clientWidth+div_text.clientWidth)}); | |
div_text.parentNode.removeChild(div_text); | |
} | |
</script> | |
</body> | |
</html> |
- 建立一個
createText()
函式讓 Javascript 產生個別彈幕的 HTML
- 用
id="button01"
按鈕監聽 click 事件來啟動 createText() 函式 - 24, 25 行: 使用亂數並以
視窗上方
(Top
)為起點建立一個隨機位置
- 26, 27 行: 加入文字於
子節點
(子彈
),再將整個 div 加入於 中(整個畫面) - 針對特定 id 的
<div>子彈
進行動畫(右至左),duration
則是移動速度 - 31 行: 跑到最左邊後要把
子彈
刪除
讓 Websocket 連結 Chatbot 跟前端吧!
Chatbot + API
首先先說明一下 Chatbot 這部分,一般來說寫 Chatbot 都是使用 Web API 的形式接收 Webhook 事件,但因為彈幕是即時性的且現在需求無需儲存文字,因此就使用 Websocket 來溝通前後端啦!
NodeJS Webhook 寫法參考這篇: JavaScript | WebSocket 讓前後端沒有距離
那我是怎麼讓 Chatbot Webhook 事件透過 Websocket 送出去呢?答案很簡單,參考這份程式碼或下方 Gist
const express = require('express'), | |
SocketServer = require('ws').Server, | |
line = require('@line/bot-sdk'); | |
if (process.env.NODE_ENV != 'production') require('dotenv').config(); | |
const config = { | |
channelAccessToken: process.env.CHANNEL_ACCESS_TOKEN, | |
channelSecret: process.env.CHANNEL_SECRET, | |
}, | |
client = new line.Client(config), | |
PORT = process.env.PORT || 3000, | |
app = express(); | |
let BULLETS = '', | |
USER_AVATAR = ''; //default message | |
async function handleEvent(event) { | |
if (event.type !== 'message' || event.message.type !== 'text') { | |
// ignore non-text-message event | |
return Promise.resolve(null); | |
} | |
const user = await client.getProfile(event.source.userId); | |
const context = await event.message.text, | |
quickReplyList = ['😆😆😆', '😊😊😊', ' 我我我我我我', '😂😂😂', '😍😍😍']; | |
let message = ' 請按下方按鈕'; | |
let items = quickReplyList.map((el) => { | |
return { | |
type: 'action', | |
action: { | |
type: 'message', | |
label: el, | |
text: el, | |
}, | |
}; | |
}); | |
if (quickReplyList.indexOf(context) === -1) { | |
BULLETS = ''; | |
USER_AVATAR = ''; | |
} else { | |
BULLETS = context; | |
USER_AVATAR = await user.pictureUrl; | |
message = ' 已發送'; | |
} | |
const echo = { | |
type: 'text', | |
text: message, | |
quickReply: { items }, | |
}; | |
return client.replyMessage(event.replyToken, echo); | |
} | |
app.post('/webhooks/line', line.middleware(config), (req, res) => { | |
Promise.all(req.body.events.map(handleEvent)) | |
.then((result) => res.json(result)) | |
.catch((err) => { | |
console.error(err); | |
res.status(500).end(); | |
}); | |
}); | |
const server = app.listen(PORT, () => console.log(`Listening on ${PORT}`)); | |
const wss = new SocketServer({ server }); | |
wss.on('connection', (ws) => { | |
console.log(`Client connected, port is ${PORT}`); | |
// Send global message to Client in the schedule. | |
const sendNowTime = setInterval(() => { | |
ws.send(JSON.stringify({ text: BULLETS, avatar: USER_AVATAR })); | |
BULLETS = ''; | |
USER_AVATAR = ''; // Refresh | |
}, 2000); | |
ws.on('message', (data) => ws.send(data)); | |
ws.on('close', () => { | |
clearInterval(sendNowTime); | |
console.log('Close connected'); | |
}); | |
}); |
- 第14、15 行,我設定了
BULLETS
、USER_AVATAR
兩個全域變數 - 45 行 則是使用 Quick Reply 功能讓用戶可以快速發送訊息
- 透過 65 行把 Socket Server 與 API Server 綁在一起
- 接著第 67~82 行的 Websocket 中使用
setInterval()
來週期性地送文字出去 - 發送後需要把
全域變數
清空,否則前端會出現 undefined
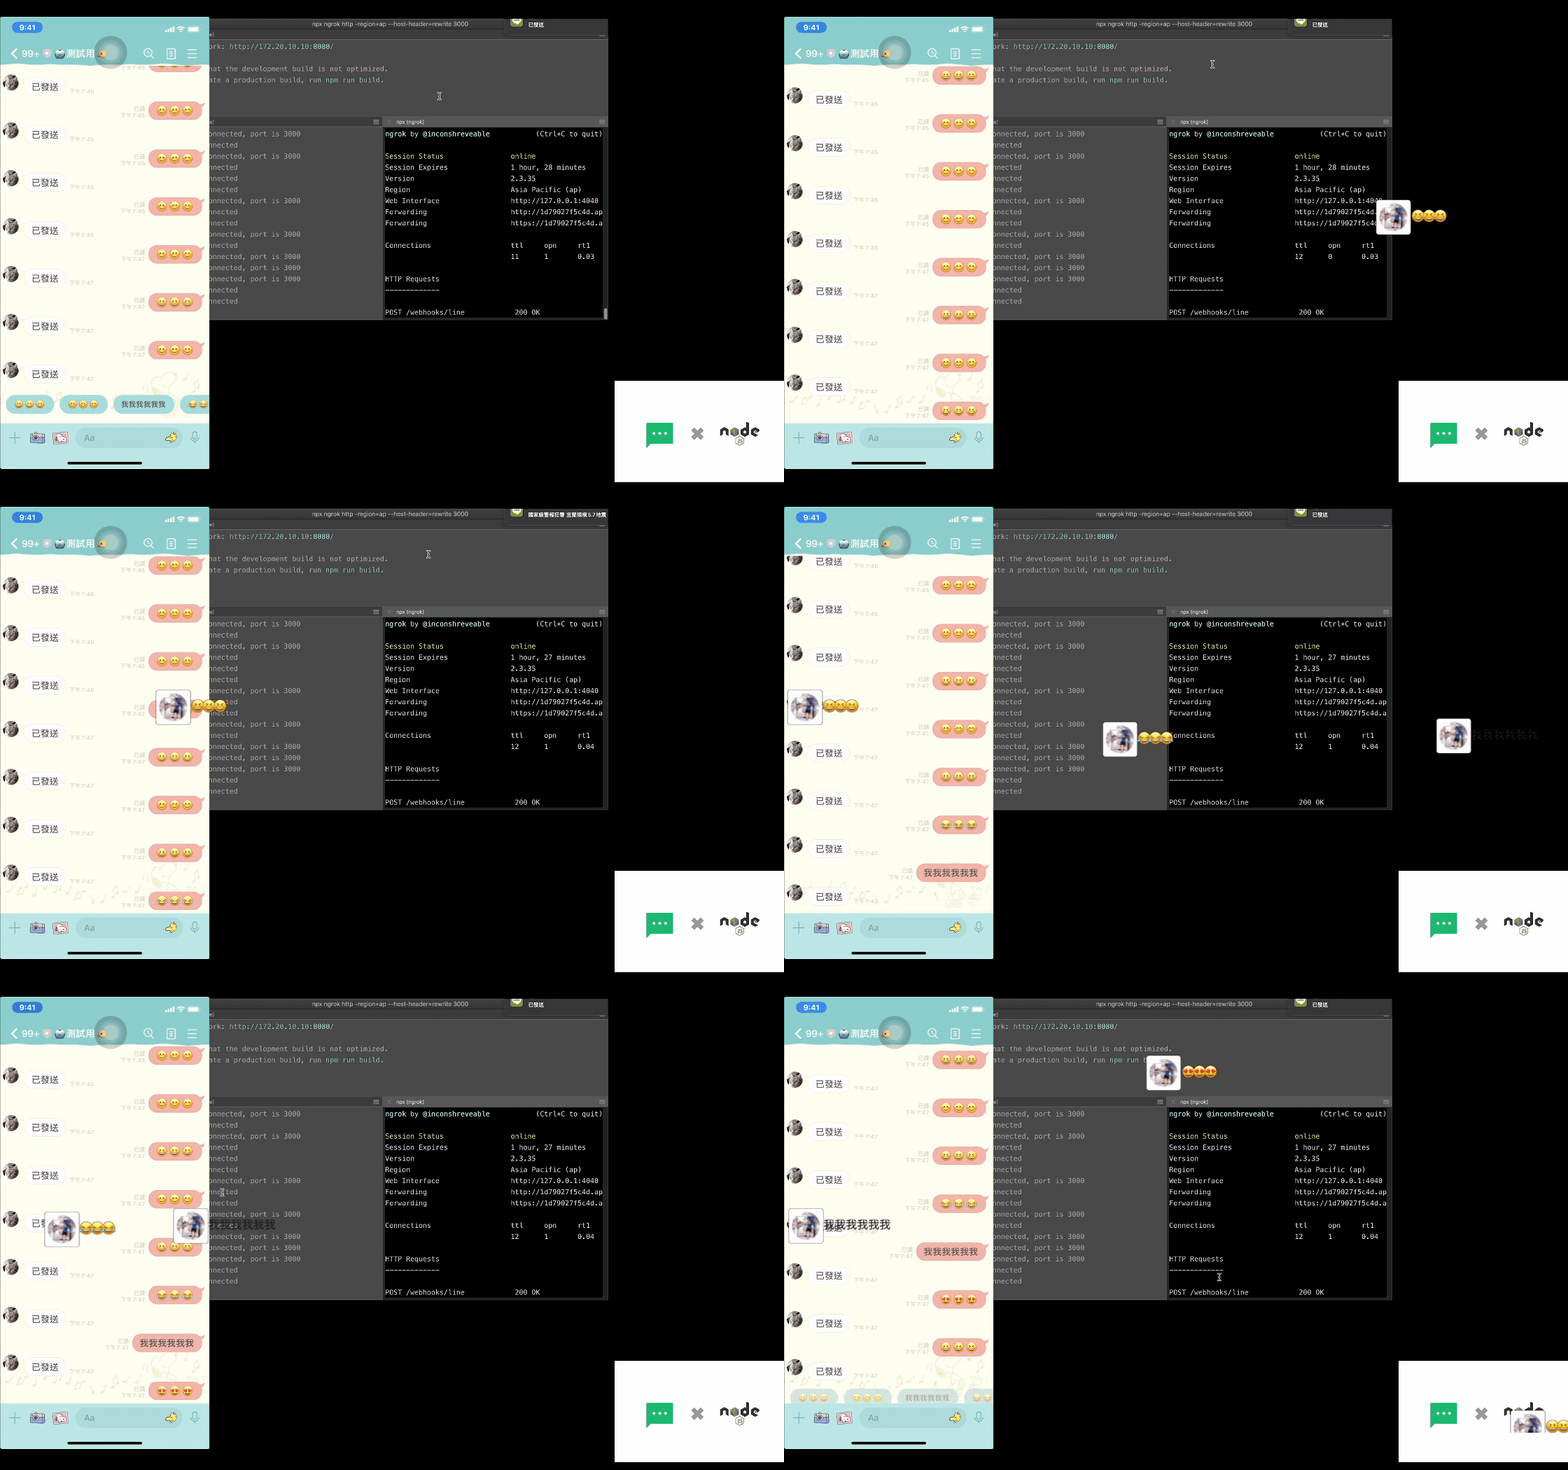
或許讀者已經注意到一開始的圖片是使用手機點選 Quick Reply,這部分初步考量是為了避免來賓亂打字導致現場不可收拾,讀者若有照著實作請斟酌使用囉!
彈幕程式碼解析
這邊為了方便我使用了 Vue 3,參考這頁的程式碼並引入了 { onMounted, onUnmounted }
來協助網頁生命週期當眾的掛載
以及卸載
,以下就來敘述一下程式碼區塊的用途:
<template> | |
<div class="barrage"></div> | |
</template> | |
<script> | |
import { ref, onMounted, onUnmounted } from 'vue'; | |
import gsap from 'gsap'; | |
export default { | |
setup() { | |
let data = ref([]), | |
count = ref(0), | |
ws = new WebSocket(process.env.VUE_APP_WEBSOCKET_URL); | |
onMounted(async () => { | |
ws.onopen = () => { | |
console.log('open connection'); | |
}; | |
ws.onmessage = (event) => { | |
const bullet = JSON.parse(event.data); | |
if (bullet.text !== '') createText(bullet.text, bullet.avatar); | |
}; | |
}); | |
onUnmounted(() => { | |
ws.onclose = () => { | |
console.log('close connection'); | |
}; | |
}); | |
async function createText(text, avatar) { | |
let div_text = document.createElement('div'); | |
div_text.id = 'text' + (count.value += 1); | |
div_text.style.position = 'fixed'; | |
div_text.style.whiteSpace = 'nowrap'; | |
div_text.style.left = document.documentElement.clientWidth + 'px'; | |
const random = Math.round( | |
Math.random() * document.documentElement.clientHeight | |
); | |
div_text.style.top = random + 'px'; | |
//<img src="..." alt="..." class="img-thumbnail"> | |
let picture = document.createElement('img'); | |
picture.src = avatar; | |
picture.className = 'img-thumbnail'; | |
picture.style.width = '50px'; | |
picture.style.height = '50px'; | |
if (text && avatar) { | |
div_text.appendChild(picture); | |
div_text.appendChild(document.createTextNode(text)); | |
document.body.appendChild(div_text); | |
} | |
await gsap.to('#' + div_text.id, { | |
duration: 8, | |
x: -1 * (document.documentElement.clientWidth + div_text.clientWidth), | |
}); | |
if (div_text.hasChildNodes()) div_text.parentNode.removeChild(div_text); | |
} | |
return { count, data }; | |
}, | |
}; | |
</script> |
- 12 行: 從環境變數中取得
VUE_APP_WEBSOCKET_URL
並建立 Websocket 連線 - 19 行: 把 Websocket 的
onmessage
監聽事件掛載起來 - 29 行: createText() 為建立一個
子彈
的函式,當中除了上述有提到的隨機位置,因為訊息是從 Chatbot 來並夾帶著用戶的大頭貼 CDN 連結,因此在42 行
就建立一個使用 Bootstrap 的元素(Element) - 由於因為 Chatbot 是週期性發送訊號,會有沒內容的情況,因此需要加判斷式(Condition)來避免錯誤的產生
在本地端啟動專案
- 先開三個終端機
- 第一個進入前端(frontend)資料夾,先
npm install
後npm run dev
執行程式 - 第二個進入 chatbot 資料夾,一樣
npm install
後npm run dev
執行程式 - 第三個使用
npx ngrok http -region=ap --host-header=rewrite 3000
來建立一個暫時含有 SSL 的網址- npx 在安裝 NodeJS 時就安裝的工具,可以遠端執行一個終端指令,在用完之後會刪除,不會污染環境
- 使用 ap 這個區域
- 覆蓋網址的 Header,避免前端呼叫時 Header 是 localhost
- 使用的 Port = 3000
你也可以部署上 Heroku,效果會是一樣的喔!
彈幕與 OBS 融合
若你正在照著本篇實作,請先下載 OBS
- 開啟 OBS 後,先建立一個場景,這邊我先放一張圖片跟視訊鏡頭讓畫面別那麼乾
- 因為是使用瀏覽器來建立彈幕,因此接著按下面的
+
並選擇瀏覽器
- 接著會彈出這樣的視窗,可以改成你喜歡的名字後確定
- 確認後會出現這個頁面,由於是在本地端 Localhost操作,因此網址部分輸入
http://localhost:8080/
,且由於視窗關係,我選擇寬度 1200 x 高度 600
- 因為會隨著建立順序,會讓瀏覽器的排序層級在下方,因此需要將它移至最上層,畢竟彈幕就是要最先讓使用者看到呀!
成果
- 最後就可以在 Chatbot 中按下 Quick Reply 來跑彈幕囉!這樣是不是很好玩呢:)
- 最後你可以錄影或是透過串流來與觀眾玩玩看喔!
結論
目前這個彈幕系統還只是很陽春的版本,未來可以加上後台調整各種內容(文字、速度…),若你對於前端有較深的理解或是想練練手,歡迎送 Pull Request 給我的 Screen-LINE-Bullets,同時也歡迎大家拿去玩玩,之後有個多應用會再分享給大家!
若對直播設定有興趣,請參考如何只使用一台 Mac 進行直播 feat. SoundFlower, OBS, Youtube
小結
立即加入「LINE 開發者官方社群」官方帳號,就能收到第一手 Meetup 活動,或與開發者計畫有關的最新消息的推播通知。▼
「LINE 開發者官方社群」官方帳號 ID:@line_tw_dev
關於「LINE 開發社群計畫」
LINE 今年年初在台灣啟動「LINE 開發社群計畫」,將長期投入人力與資源在台灣舉辦對內對外、線上線下的開發者社群聚會、徵才日、開發者大會等,已經舉辦 30 場以上的活動。歡迎讀者們能夠持續回來察看最新的狀況。詳情請看: